
DIY Braided Dollar Tree Pumpkins
- Sep 19, 2019
- 3 min read
Updated: Jan 15, 2022
Hello friends!
I am in the full-on fall decorating zone now, you guys. The leaves are falling and the air is crisp. I love this time of the year, it's always been my most favourite time to cozy up and get my craft on!
I made these absolutely adorable braided pumpkins with just some supplies from the dollar store (where else??). Today I want to show you how I made these with just a few easy steps and some supplies you probably already have at home...so let's get started!


What You Need:
Dollar Tree Styrofoam pumpkins
Thick yarn in the colour of your choosing. I chose this brand which I found at Dollarama
Knife
Scissors
Craft paint in a colour similar to your yard (optional)
Wine corks
Faux greenery stems
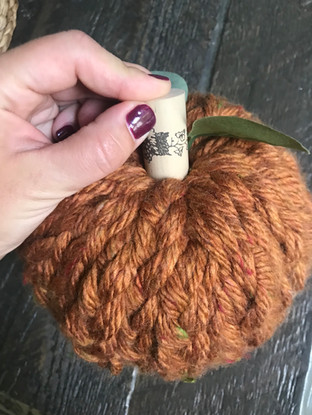
Step 1:
Start with your dollar tree pumpkin and remove the stem simply by pulling it out. Turn your pumpkin upside down and carve a hole into the styrofoam about 1.5 - 2 inches wide.


Step 2:
This part is optional but can make things look much nicer in the end. With some craft paint, you can paint your Styrofoam pumpkin in a colour similar to your yarn so that you can be less worried about any of the original bright orange colour peeking through the braids. In this post, I chose not to do it, but I did paint a few others I did afterwards.
Step 3:
Take your yarn and cut 9 equal pieces at 26" long. Next, tie off one end of all of the gathered yarn and then simply start braiding it into 3 sections of 3 pieces each. After I finished braiding, I tied it off at the end with another piece of yarn. I used 1 1/4 packages of yarn to make enough braids to cover my entire pumpkin.


Step 4:
Tuck one end of the yarn in to the hole and wrap your braid all the way around your pumpkin. Now take the other end of the braid and also tuck it in to the hole. Do this with all of your sections of braids you have pre-made until you have fully covered your pumpkin. I tucked my braids underneath the previous braids every time I added in a new one.


Step 5:
Now that your pumpkin is all covered in braids, all you need to do is finish it off with a stem and add some greenery by poking them into the hole. They will both fit snug with all the braid ends tucked in there.


...and that's it!! Isn't it a cutie!? I just love being able to take a simple $1 pumpkin that starts off being quite boring and ugly and with some simple pretty yarn, turn it into a textural and charming pumpkin to add to your fall decor!
Since making this rust-coloured one I have made a few more in different colours and I think I will continue making some for cute gifts as well. Also, look for smaller-sized styrofoam pumpkins in dollar stores as well. I made some mini versions and they look so cute layered with the larger ones.


I hope this simple blog tutorial helps inspire you to get creative with some fall decor. Not all decor needs to be purchased brand new. I did see some braided pumpkins at Home Sense but wasn't willing to pay what they were asking for them.
I knew they could be something fun I could make at home myself. So run to the Dollar Tree and get your Styrofoam pumpkins now before the season is over!! Oh and be sure to share with me your creations on my Instagram, I love seeing your versions as well, as you guys inspire me so much too!
Have a wonderful day :)
Dale Marie


In999 Register honestly felt much easier than I expected while creating an account yesterday evening on my phone. Usually these kinds of platforms ask for too many unnecessary details during setup, though thankfully that didn’t happen here. The pages loaded properly and the process also stayed smooth throughout registration. Even verification worked without repeated retry issues appearing. Overall, the experience felt comfortable enough for someone using the platform for the first time without any extra confusion during account setup.
สล็อต เว็บ ตรง
Learn Digital Marketing Fundamental and Strategies FODM
wedding venues in manesar List of Farmhouses , Banquet Halls, Hotels for wedding venues in manesar Ever thought of enjoying a multi-theme Wedding Function while being at just one destination? If not then you must not have visited manesar Farmhouses.
Wedding Venues in kapashera List of Farmhouses , Banquet Halls, Hotels for Party places in kapashera and NH-8 and Pushpanjali Ever thought of enjoying a multi-theme Wedding whileFunction being at just one destination? If not then you must not have visited kapashera NH-8 & Pushpanjali Farmhouses.