
Chalk Painted Kitchenaid Mixer
- Jan 27, 2020
- 8 min read
Updated: Jan 18, 2022
Today I want to talk about my most loved kitchen appliance, my Kitchenaid Mixer! I think I may even love this appliance more than my own coffee maker!! Now that says a lot guys cause I looooove my coffee maker. I've had my Kitchenaid Mixer since 2006 and it still works as powerful as the day I first got it. I have put so many miles on this bad boy, from baking countless batches of cookies to whipping mashed potatoes and making our own pizza dough every friday night, this mighty machine gets used a lot! The only thing I don't like about it, is the colour! I picked out red you guys....I mean NO offense to anyone who likes red or owns the red one like I do, but for me I think it's the one and only red item I have in our house now. I picked out the red when red accent walls were a big trend and red satin pillows were on my sofa, but now 14 years later, my house is on the neutral trend like so many others and my accents have been blues and cream shades for years. As great as my mixer still is and functions....I simply use it and then set it back in it's hidden room, the sad dark pantry, but enough is enough you guys!! It's finally time to take it out of the darkness of the pantry and let it see the light of day!! Can I get an AMEN??!
So that's why I am here today friends.....to talk about how I spray painted my Kitchenaid mixer with Chalk paint and just how GORGEOUS it turned out! Do you have a mixer too? Maybe you bought the apple green colour or even a silver or black one and just wished you had a different shade on it now that your taste has change. Well follow along with my tutorial including all the steps to make yours shine brightly again too, and put a big happy smile on your face every time you look at it.


Supplies Needed:
Kitchenaid Mixer (obvs)...or any appliance you wanna paint for that matter!
Sanding sponge in 120 Grit
Sanding paper in 220 Grit
Painters Tape
Philips Head Screw Driver
Flat Head Screw Driver
TSP Degreaser or a good degreasing cleaner
1 can Rustoleum Chalked Spray Paint, this is the colour I used
Drop cloths or plastic sheets
Step 1:
Set up in a well ventilated area like a garage. You can also do this outside, but make sure it's warm enough with little wind. Set out your drop cloths onto a good work table you don't mind getting a bit dirty. We love using folding tables from Costco for our projects.
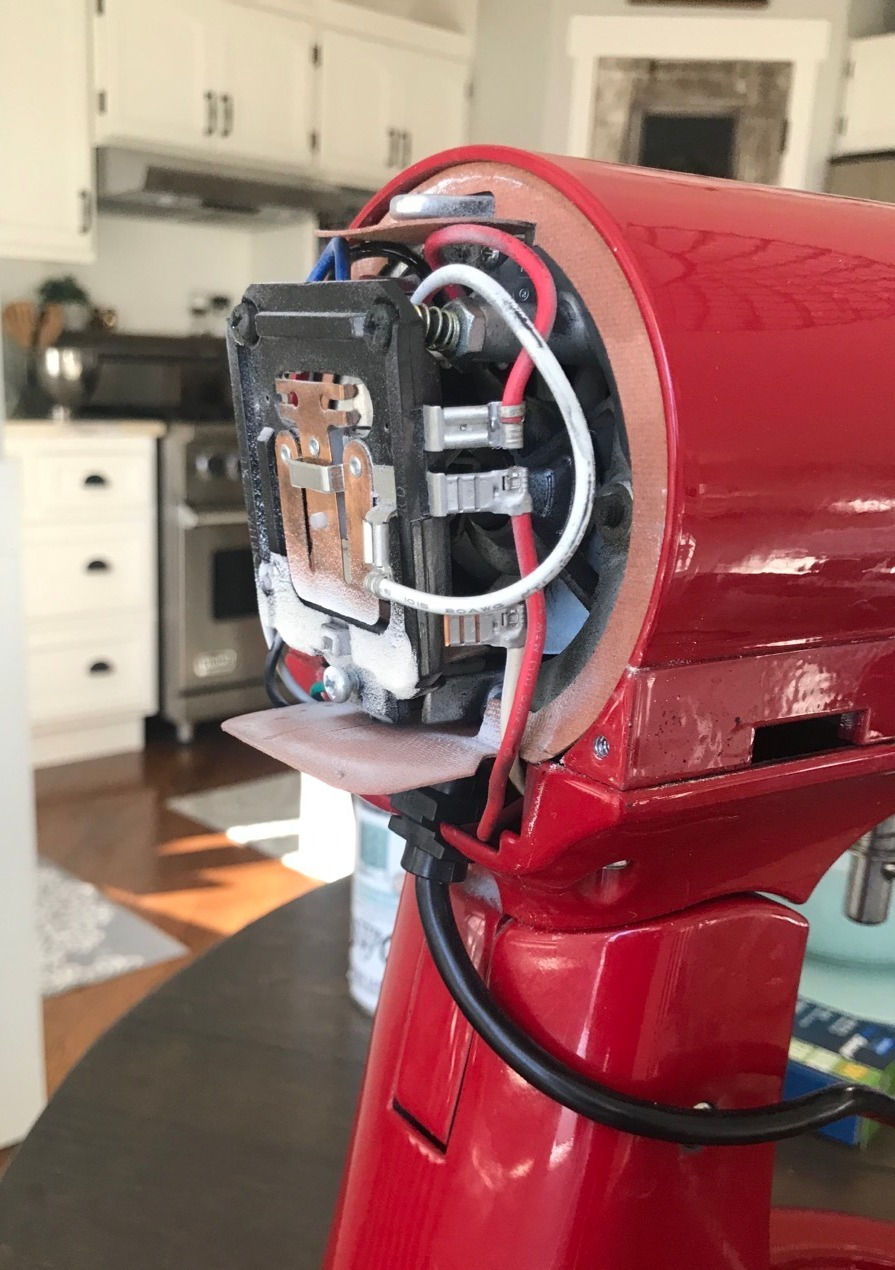
Step 2, Taking Your Mixer Apart:
You will need to remove a few parts of the mixer before you paint. It's important whatever parts you remove that you carefully place to the side and together so you know how to put everything back properly ensuring it's in working order again.
The first piece I removed was the bowl plate on the bottom with my Philips head screw driver. There are 3 screws holding it down.


The next piece l removed is the front round silver plate and knob. You can remove this simply by turning the black knob to unscrew it and take it out, once you've taken off the black knob the silver plate will come right off.


Next take off the silver banding that wraps around the top of the mixer. There are two screws holding it into place at the back of the machine.


The very last piece I removed was the back dome plate that covers the motor. There is one screw at the top of it that you will need to take off.

Step 3:
Wash your Kitchenaid Mixer with TSP. I like using TSP because it's heavy duty. A lot of professional painters prep their cabinets with this product before they paint. It's amazing how well this product works to prep and clean a surface and it's quite gross what comes off! So scrub your mixer down first, being very careful to not get those wires and the motor wet. If you are worried about this, then you could always saran wrap around your wires to help protect them and do a dryer wash in that area.
I used a toothpick to really get out all the years of gunk in the nooks and crannies as well as using a scrubbing sponge to scrub the mixer down.


Step 4:
It's now time to tape off all the important parts that you don't want to get painted. I would suggest using Frog tape as I find it's the best painters tape to leave a clean line behind and fully protect the areas you don't want to get painted. I first taped off the silver spring rod that your paddle would clip on to. Then you need to carefully tape off the motor itself. I first formed a circle around all the wiring with my painters tape, then took a bunch of saran wrap and placed it in the circle. The painters tape stuck to the saran and kept it in place. Then keep taping over top of that saran wrap a bunch more times and back again around the circle. Check underneath too, are those wires all covered? Make SURE!


Next tape off the silver trim that goes around the head, near the paddle attachment rod. I carefully lined the tape up to the top line of the silver trim, then cut the tape around half way so that it would fit properly when tucked under.


I also taped off the side knobs to adjust speed and head tilt as well as well taping off the full length of the cord. Once your machine is fully taped you can also tape off the small screw heads you don't want painted, using an Exacto knife to cut out a circle. I chose to just apply vaseline on these areas to avoid the paint from getting on them, but it's something I later learned was more work in the end. Even when I thought I cleaned the vaseline off of areas that I wanted to paint, there was still some there and the paint came off.
Step 5 (optional):
Now that your mixer is squeaky clean it's time to sand it down a bit. This was not necessarily a step that I had to do, as most spray paints do not require a sanded surface to stick to, especially this chalk paint spray paint, but again I always like to thoroughly take all steps that could help adhesion even further. I sanded mine down with the 120 grit sanding sponge by 3M and any areas I could not get with my sponge I used 220 grit fine sanding paper.


Once its sanded, vacuum off the dust and wipe it all down. When you've got it all cleaned off and dried you are finally ready to paint!

Step 6:
Be sure when you are ready to spray paint that you are not standing too close to the machine. If you are too close your spray paint will more than likely get too thick and drips might happen. So stand back and apply light mists continually moving while you spray. Be sure to tilt the head back so you can spray underneath as well. After my first coat set for about 1 hour I sprayed on the second coat on. I let my second coat dry over night. The next day when I checked on the mixer I carefully looked over the machine to see if I had missed any spots and there were quite a few on the underside of the neck and around the base as well. Be sure you do the same thing, check very close to see how good your paint job appears. I went ahead and applied 3 more coats. It may have been a bit excessive, but I really didn't want to have to find out later there were any spots I missed once I took the tape all off and set it back up again.


Step 7:
Check over your spray paint application one more time before you go ahead and apply your sealer. Check if any bumps are anywhere, now is the time to fix that by sanding down smooth the imperfections with a 220 grit sanding sponge very lightly. Once everything looks good it's time to spray the sealer on. I originally chose a Semi Gloss finish, but changed my mind and decided on the higher gloss instead. I thought it would show off the colour a bit more if it looked glossier and might be a bit easier to wipe down clean. I applied 3 coats of the high gloss spray paint making sure to wait the proper dry time in between coats.

Step 8:
Very carefully take your tape off. I always like to take my painters tape off when my paint is still slightly tacky, not wet but a little bit tacky. I find it gives a nicer crisp line. If you wait until the paint is fully dry then sometimes your line will be a bit more bumpy.
Step 9:
Now you can put your machine parts back on. Your paint will probably not be fully cured at this point unless you waited the full 7 days...I know I sure didn't because I'm very impatient and who is gonna wait that long when you're this close to seeing your beautiful mixer all complete!? Anyways, just be super careful when reassembling it! I would hate you to make any dings or scratches at this point.

I will show you guys a few areas where I had some touch ups to do, including where I removed the Vaseline around the screw heads and it how it took off some of the paint. Also, underneath the levers to adjust the speed and head tilt scratched a bit so I took some actual chalk paint that I had in the same colour with a small brush and touched those areas up. If you don't have the actual paint, just spray some spray paint into a mason jar and use a small brush for any touch up also you may need to do.


All of my touch ups are finally done and it's now time to show off my mixer on my counter top proudly!


What do you guys think of the finish!? To me it looks like the mixer was bought this way! I have 0 regrets painting it, not with results like this! No it's not perfect, don't expect it to have that same factory glossy enamel feel like it did before. I mean I'm no professional, but I think it looks pretty darn incredible for an under 20$ makeover! At this point though my mixer is still not 100% cured so I am going to refrain from using it for about a week to give it a good change to really harden. I can easily dent the paint if my nail or a utensil hits it too hard.
I've already received so many comments on my Instagram about this project! A lot of you are saying that you have a coloured mixer too that you are not very fond of anymore. You guys were just like me keeping it hidden in the dark cupboards, lol! Well now's the time to give it a makeover and bring it out of hiding! Besides this machine is a beast, it's certainly not cheap and deserves all the attention back up on your counter top showing itself off proudly.
Have a wonderful day friends!
Dale


This was a creative and inspiring transformation! The step-by-step explanation makes the process feel approachable, even for someone new to DIY projects. I especially liked how you balanced aesthetics with practicality, which is often overlooked in similar tutorials. Around the middle of the article, it reminded me of a discussion I saw on https://gocollectiv.com/ that explored creative customization ideas and user experiences with home projects. It’s always interesting to see how different approaches align. Thanks for sharing such a detailed and motivating guide.
This is also a very good post which I enjoy reading. It is not every day that I can see something like this. Call Girls in Amritsar | Amritsar Call Girls | Call Girls Amritsar | Amritsar Escorts | Amritsar Escort | Escort Service Amritsar | Escort Service in Amritsar | Amritsar Escort Service | Amritsar Escorts Services | Call Girls Service in Amritsar | Call Girls Service Amritsar | Escort Amritsar | Escort in Amritsar
That is why we provide Andheri Call Girls Service for the best-in-class companionship; you must check them out.
Artists who adopt a one-page website gain both exposure and revenue. It helps them reach new audiences and sell their work in a simplified way. rajabandot togel
Get free Chegg answers and free Course Hero answers with Homeworkify. The website is straightforward and designed for student convenience. chegg unlocker