
How to Paint Kitchen Cabinets and a 5 Year Update!
- Mar 8, 2020
- 10 min read
Updated: Jan 18, 2022
Do you have a kitchen that's in need of a refresh on a budget? Do you have perfectly good bathroom vanities but don't like the original colour of them? Well today I want to share with you guys how I paint kitchen cabinets with a paint brush and roller with near perfect results, and a 4 year update on my very own kitchen after heavy daily use!


First thing I should mention is I painted my kitchen 4 years ago, so before I started blogging and using Instagram, so even though I don't have many pictures of the actual process of how I painted my own kitchen I did recently paint a staff room kitchen and plan to use that to explain to you guys the exact process of how to do it.
A key thing I always like to stress when painting cabinets is to not skip out on the important prep work. I know sanding is never any fun, but how long do you want your paint job to last for? Also how often are you going to paint your cabinets? Probably once right, maybe twice? Well lets do it right the first time so you don't have to do it again:)
* Please note that all supplies I mention are products I personally use and have tried and tested. I do not receive any compensation for mentioning these products and all opinions are my own.
Tips Before We Begin
*I like to paint on a large flat surface like a clean floor or a large table. I lay down large plastic drop sheet first then grab scrap pieces of wood so that my cabinet doors are not directly on the plastic. You can also use these great little inventions to place your doors on. If you decide to paint outdoors please don't paint on a windy day, or a in an area where if there is a gust of wind a bunch of sand or dirt will land in your wet paint. I prefer to paint inside of my garage and if I ever paint in the winter I always use a space heater.
*Use painters tape on any floors around your cabinet frames and on the walls.
*Plan to get dirty, always wear clothes that can get paint on them and have a respirator on hand if you plan to use the respirator I mention below.
*There are 2 important 'P's to remember when starting your cabinet makeover, PREP and PRODUCTS. If you stick to properly prepping your cabinets and doing every step I mention below and follow that with good quality products you will have a highly durable and beautiful paint finish.
Supplies Needed:
1 quart or gallon of Benjamin Moore Advance Paint (Semi Gloss or Pearl)
1 quart or gallon of Zinsser Cover Stain Primer
High Density Foam Rollers (I like to buy the multi packs)
2" Paint Brush, Purdy's brushes are my fave
Small Paint Trays
2" Frog Painters Tape
Tray liners or use my trick of heavy duty aluminum foil to line the tray!
150 Grit Sandpaper
220 Grit Sandpaper, I like these flexible sponges
Before we begin lets take a look at what we are starting with here! We painted this kitchen at my kids school on the tiniest of budgets. I spent a total of $125 to transform this kitchen in the teacher's staff room. I mean what school has extra money to spare on cosmetic upgrades right?? So, I was happy to help with a couple helpful friends and take on this challenge to give our hard working teachers a space they deserved to enjoy during their much needed and deserved down time.

Step 1:
First thing I did was remove all of my cabinet doors. Removing them is the best way to get a professional finish. Don't try to paint around the hinges, it's not worth it and no matter if you tape it's not going to look as good if you removed them.

Step 2:
Wash your cabinet doors and frames down with TSP. You must not skip this step. This is so important. If you don't give them a thorough degreasing with a heavy duty cleaner no matter what paint you use there will be chipping in no time as your paint will not get proper adhesion. This stuff is strong, so I recommend using gloves when you use this stuff. Read the directions on the box for proper dilution ratios, or you can also use the ready made solution in a spray bottle.

Step 3:
Once everything is properly washed, rinsed and dried it's time to sand them all down. Ugh I know here comes the messy part, but lets just get it over with shall we!? When I sand my doors and frames I don't sand so much that the old stain comes off, I just scratch them up a bit by lightly going over them with a 150 grit sanding sponge or paper. You just need to etch the surface so the primer and paint has more to grab onto to. Think of this step like your insurance to a long lasting paint finish. One you've sanded down all of the surfaces, wipe them all off with a tack cloth or a lightly dampened rag until all the sanding grit is off.

Step 4:
Now that your doors are all cleaned and sanded it's time to give your paint it's first coat of primer. The primer I've selected is a smelly primer as it is oil based. If you are painting indoors you will need to wear a respirator and open your windows. If you are painting outdoors you still may need to wear the respirator, this stuff can give you a headache. I have tried many primers but this one hands down is the best one I've tried. Oil based paints will always give you the best longevity, but the draw back is the stanky smell!! When I apply this product I use a brush that I use only for oil based paint. Mineral Spirits is a chemical you can use to clean oil paint out of paint brushes, but I sometimes find it hard to really clean the old paint out, so I like to buy a less expensive brush that I don't mind throwing out once I'm done my projects with oil paints or stains.
First place I always paint is in the grooves and uneven surfaces of my doors with my 1.5" brush. Be careful anytime you paint that you don't over load your brush. You don't want any drips or too much paint gathering in your corners, just an even thin coat. After your grooves are done use your 4" high density roller to role on the primer on all the flat surfaces including the sides. Again do not over saturate your roller, just enough so that your roller is fully coated with paint but not dripping.

Step 5:
Now that your primer is dry you should sand your surfaces lightly to smooth out any grit or dust that may have settled into the paint with a 220 grit sand sponge. Wipe clean. You can apply 2 coats of primer to really give your paint job extra longevity. This second coat of primer is not necessary, but I decided to do it for my kitchen cabinets cause I knew they would get heavy daily use and lots of abuse with little kids. Once your primer has fully dried get your paint tray ready with your Benjamin Moore Advance paint. Same as in step 4 you will paint in your grooves first with a 1.5" angled brush. Once your grooves are painted use a new 4" roller and role your paint onto the flat surfaces. I love using my roller for my cabinet frames and boxes, this gets the job done fast. Try not to role back and forth too many times as this can create air bubbles. Also if you do find you have air bubbles once you have finished rolling don't panic as this is a self levelling paint and most imperfections level out as it settles. I waited about 8 hours before I flipped over my doors and painted the other sides. Make sure when you do flip over your doors that you lay some pieces of paper towel down so that your freshly painted doors are not sitting directly on the raw wood. Advance paint needs a full 24 hours before you can apply your second and final coat

Step 6:
Now that your first coat has dried you can paint your final coat on repeating all of the same steps in step 5 including a light sanding first to smooth out any imperfections if necessary. With Advance paint you DO NOT need any final sealer or clear coat. This paint is highly durable and does not need anything else! Once your paint has sat for 24 hours you can put everything back together onto your cabinet bases and lightly use them.


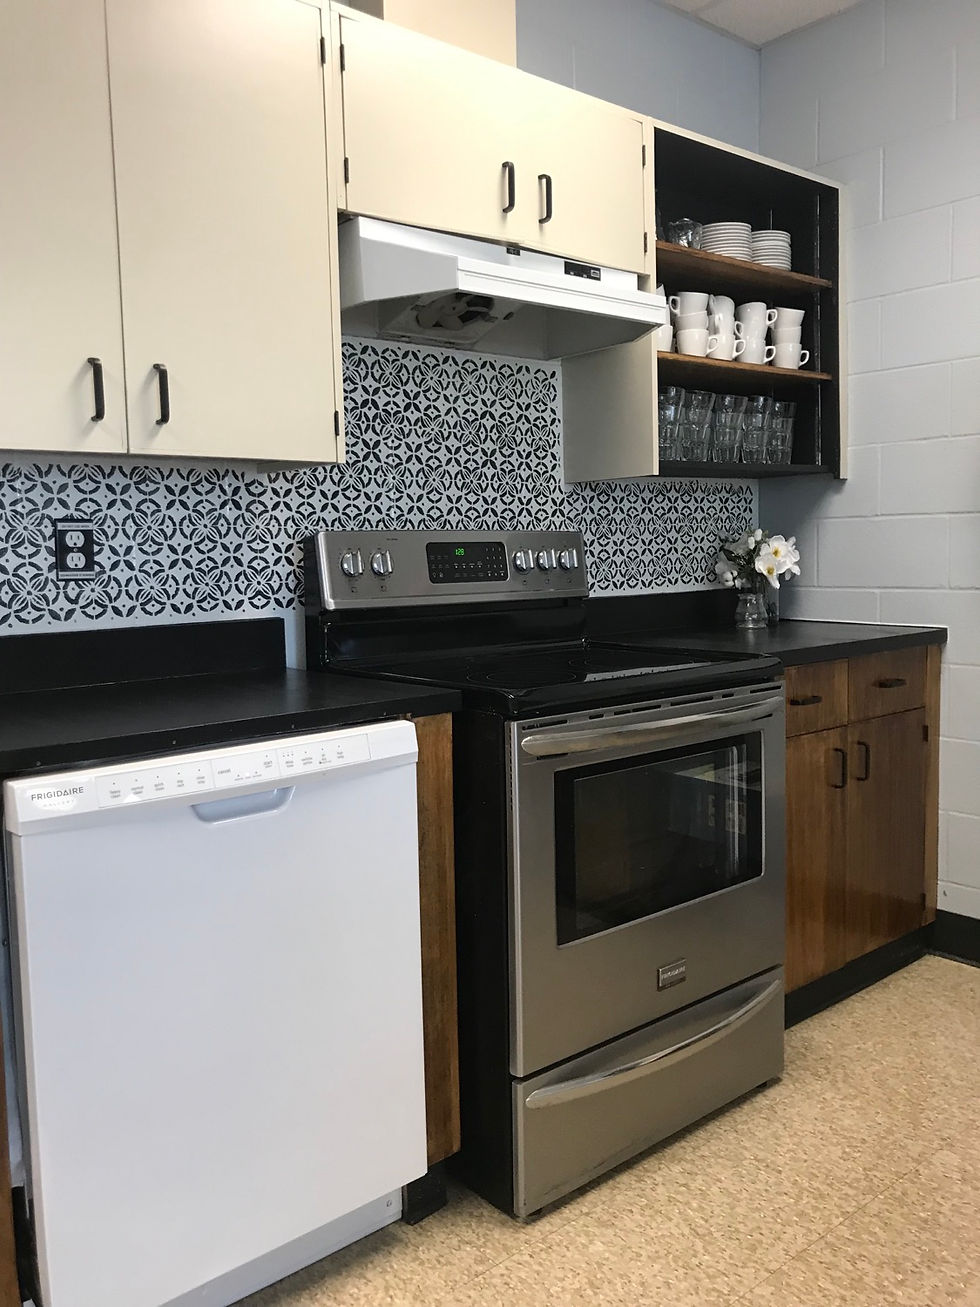

In this kitchen we also...
-spray painted the original pulls
-stencilled the black and white back splash on
-gel stained a faux wood look on the bottom cabinets
-created the look of floating shelves by taking out two doors from an end cabinet and painted the back ground black.
-painted the yellow counter tops with a durable black trim paint.
Here are a few more pictures from our $200 staff room makeover!


My Painted Kitchen Cabinet Update 5 Years Later...
Alright so now let's get down how well my own kitchen has held up since I painted it 5 years ago using this very same process. First let's take a look at some before photos of my kitchen so you can see what I started with


And here are a few bad progress shots.....


Yikes that's a hot mess right? I always knew when we first walked into our house that I would paint out the kitchen cabinets and live with it until one day when we can do a full reno. The oak cabinets were in great shape and only needed some paint to freshen them up. So here are some pics of the after and what it looks today...


Looks a lot better after hey!? It's truly amazing what paint did in this space to turn our kitchen into a bright and clean looking room. I decided I wanted to blend my granite in a bit more instead of being the main focus as it was before. So I pulled the greys and creams out of it and let those colours be more of the focus rather than the oranges like before. On the island I chose Benjamin Moore Galveston Grey and for the rest of doors, Benjamin Moore White Dove.
Alright, so has it been holding up for the last 5 years?? Well I am so happy to say it has held up beautifully!! You guys I said the two most important 'P's when painting are PAINT and PREP and this is a shining example of that. We are not gentle in this space. We use our kitchen daily. My husband and I both cook and our kids are well....kids, they are rough and bang into things, so yes there are spots that are starting to show wear and tear, and let me show you those spots now...


So you can see there are a few spots that are chipping, but nothing major and these doors are all the ones we use the most so I'm not at all surprised they are they first to show their wear. This will be easy to touch up when I can get around to it!
So that's it guys....that's all that I can see when I went through my kitchen today and zoomed in on all the trouble spots that showed any issues. I have to say though, for this being a non professional paint job I'm pretty darn proud of how it's held up!
FAQ's
-Can you see the wood grain still?
Yes, you definitely can. This was never something I cared about or to be honest even crossed my mind when I was painting my kitchen. However, some people like the wood grain to be completely gone and there to be a flawless finish. There are products on the market, like wood grain fillers that you can use to give you that look.
Here is what my grain looks like up close. I kinda like it actually!

-Did I use a paint conditioner?
First of all what a paint conditioner is, is an additive you put in your latex paint to aid in eliminating brush and roller marks. I did not use it, but the only reason I didn't use it was because I couldn't get my hands on any! Most of our stores don't care this product I've learned. It may be more popular in the US. I know a lot of my blogger friends swear by it and would never even consider painting anything without it. Here is a link to the most highly praised product, and if you are painting a large space like a kitchen I would definitely consider using it to give you more professional results.
-Is there a texture look to your paint? Is it flawless?
Definitely not flawless, but pretty darn good! Whenever you use a roller you will always no matter what have a look of a subtle texture, but I need to say this is only something you will see if you get up super close to my cabinet doors and look really hard (you can sort of see it in the pics above of the chippy areas). I think the only way to avoid that look entirely is by using a paint sprayer! It is not something that has ever bothered me at all.
-What sheen did you paint your cabinets in? What is the best sheen to use?
I painted my kitchen with semi gloss. I think if you go with a semi gloss, pearl or even a high gloss in the Benjamin Moore Advance paint you will have a much more durable and scrubbable surface to work with.
-How long did it take you to paint your kitchen?
In total one week. I did break this into phases. I painted the entire section along the back wall and put them back together, then did my island and put that back together and the very last section was by my fridge. I did this to make it feel less daunting and also to feel less messy. I didn't want all the doors to be off of my kitchen for over a week, cause I knew that mess would drive me nuts and by sectioning it off, it some how made it feel more bearable. Hope that makes sense?
-Does this method work on all surfaces? Mine are laminate?
Yes! If your cabinets are laminate, you absolutely can do this same process to get the same great results.


I love my kitchen now you guys. Before it used to make me sad. I've said before many times in my blog and on instagram how colour can effect my mental state. When we first moved in, even though I knew we would be fixing things up in this house, the darkness really brought me down at times. I love to be surrounded in light and bright fresh looking spaces, it may not make sense, but it does make my heart happy!
A few other things we did in this kitchen....
-Added the DIY cubbies above the cabinets
-Painted the original backsplash
-Gave the original wood pantry door a layered paint look to make it appear more old and worn
-Spray painted the original hinges black, those are still holding up well minus the ares where the metal rubs together but it's barely noticable.
-Added all new affordable cabinet pulls and cup pulls from Ikea.
*I still want to scrape those awful popcorn ceilings and get more modern pot lights. I would prefer to not have any fixture above my island, but rather a clean sight line. I think that will really help this area appear taller and give our 8 foot ceilings some height.


I hope this has helped give you guys some guidance as to how to paint your kitchen cabinets! Don't be afraid.....just use the force! As in the force of your paint brush!! You will be so happy you took the plunge into a project that will give you years of happiness and a space to be proud of!
Have a wonderful evening!
Dale


This transformation is seriously impressive — love how much character paint alone can add to a kitchen! If anyone around Huntington Beach is in need of kitchen services, this is a great example of what’s possible on a budget. Prep and quality products really do make all the difference!
Painting my kitchen cabinets was such a game-changer for my space—it gave my old cabinets a fresh, modern look without breaking the bank. I really appreciate how important the prep work is; it definitely made the paint last longer than I expected. This guide makes me feel confident to try it myself and breathe new life into my kitchen cabinets!
PAUTOTO
PAUTOTO
PAUTOTO
PAUTOTO
PAUTOTO
SUPTOGEL
SUPTOGEL
SUPTOGEL
SUPTOGEL
SUPTOGEL
BANTOGEL
BANTOGEL
BANTOGEL
BANTOGEL
BANTOGEL
GUATOGEL
GUATOGEL
GUATOGEL
GUATOGEL
GUATOGEL
LAMTOTO
LAMTOTO
LAMTOTO
LAMTOTO
LAMTOTO
LPG888
RAPTOTO
SlotGacorGuide
SlotGacorGuide
qfscoin qfscoin
dnsbtc dnsbtc
qfscoin qfscoin
dnsbtc dnsbtc
paxmining paxmining
paxmining paxmining
cm miner cm miner
golden mining golden mining
optominer optominer
EarnMining EarnMining
ri mining ri mining
qfscoin qfscoin
dnsbtc dnsbtc
qfscoin qfscoin
dnsbtc dnsbtc
paxmining paxmining
paxmining paxmining
cm miner cm miner
golden mining golden mining
optominer optominer
EarnMining EarnMining
ri mining ri mining