
Mudroom Makeover and Ikea Hemnes Hack
- Feb 17, 2019
- 8 min read
Updated: Aug 14, 2020
Hello friends! I have been looking forward to getting this post together for you all for quite some time. I have to say nothing else on my Instagram page gets more questions than that of the changes we made in our mudroom and how we made our Ikea Hemnes mudroom storage unit. Here I will walk you through what we did in this shared laundry/mudroom post, and how we did it on a low budget to make this a much more functional and useful space. Now, I can actually look forward to coming in here and doing laundry rather that shutting the door and walking right past it, in fact we even took the door off in here so we can walk by and just admire all our hard work!

Ok so let's get to the before pic of this space first so you can truly appreciate how much work we did in here and the reason why I actually like doing laundry now (I know right?).....

Not much to look at there right? I very boring laundry space indeed. I mean the machines were so deep and high up on those pedestals I could never reach those little cabinets up above! I'm only 5'2" and I gotta say it did drive me a little crazy to get up there every time with a step stool just to get my laundry supplies, which I might add didn't even fit in those small cabinets most of the time anyway. I know, I know, I sound a bit ridiculous complaining about these things, but trust me I am very thankful to even have this dedicated laundry space AND on the main floor with this house! In our last houses all of our laundry rooms were in the basement and I gotta say I wasn't a fan of hauling up loads of laundry all the times, especially with having little babies and the mountains of laundry that came along with them!
Ok onto the next pics below. I never snapped enough pics of this space beforehand, but you can see my husband working in here mid-reno. Here you can see the frame of the old mudroom closet after he ripped it out. This oversized closet sat right across from our washer and dryer, which was so awesome cause every time I opened the doors of the washer and dryer I had to turn to the side so I wouldn't get sandwiched into the closet doors.


It already looks SO much bigger in here by taking out that stupid closet. Once the closet was taken down, the ceiling was mis-matched from the popcorn texture missing from where the frame was, so we scraped the popcorn off the ceiling using a water bottle and drywall knife. All we did was lightly mist the popcorn with water and scraped it off in long strokes. Gotta say you guys, this is one messy job, but man is it satisfying to see it go, and so easily too...it comes right off because ours wasn't even painted! We were going to just go ahead and paint the ceiling, but decided because it was such a small space, that this was a great opportunity to get creative and add some character in here, and that included the ceiling too. We attached some faux shiplap right over top of the area we scraped and went ahead and painted it white. I could already see this space taking on a whole new vibe just from the white shiplap up above!
Ok, so now onto the flooring. Gotta love those classic 12×12″ white floor tiles of the ’90s right? They needed to go ASAP! The grout was so black from years of dirt there was no chance of cleaning them, so I never even tried. Also, the tiles had been so badly damaged and cracked from all the years they were literally falling apart. If most of you guys know me, I like to work with what we have if we can to try to save money, but in certain cases such as this flooring, we just had to rip then out and buy new.
Here you can already see the exciting progress of what’s being done! The washer and dryer are out, the closet is ripped out and so is that awful flooring! We literally had a blank room to work with which to me was just the best part of all. So here Curtis is installing our new floor tiles, aren’t they pretty!?


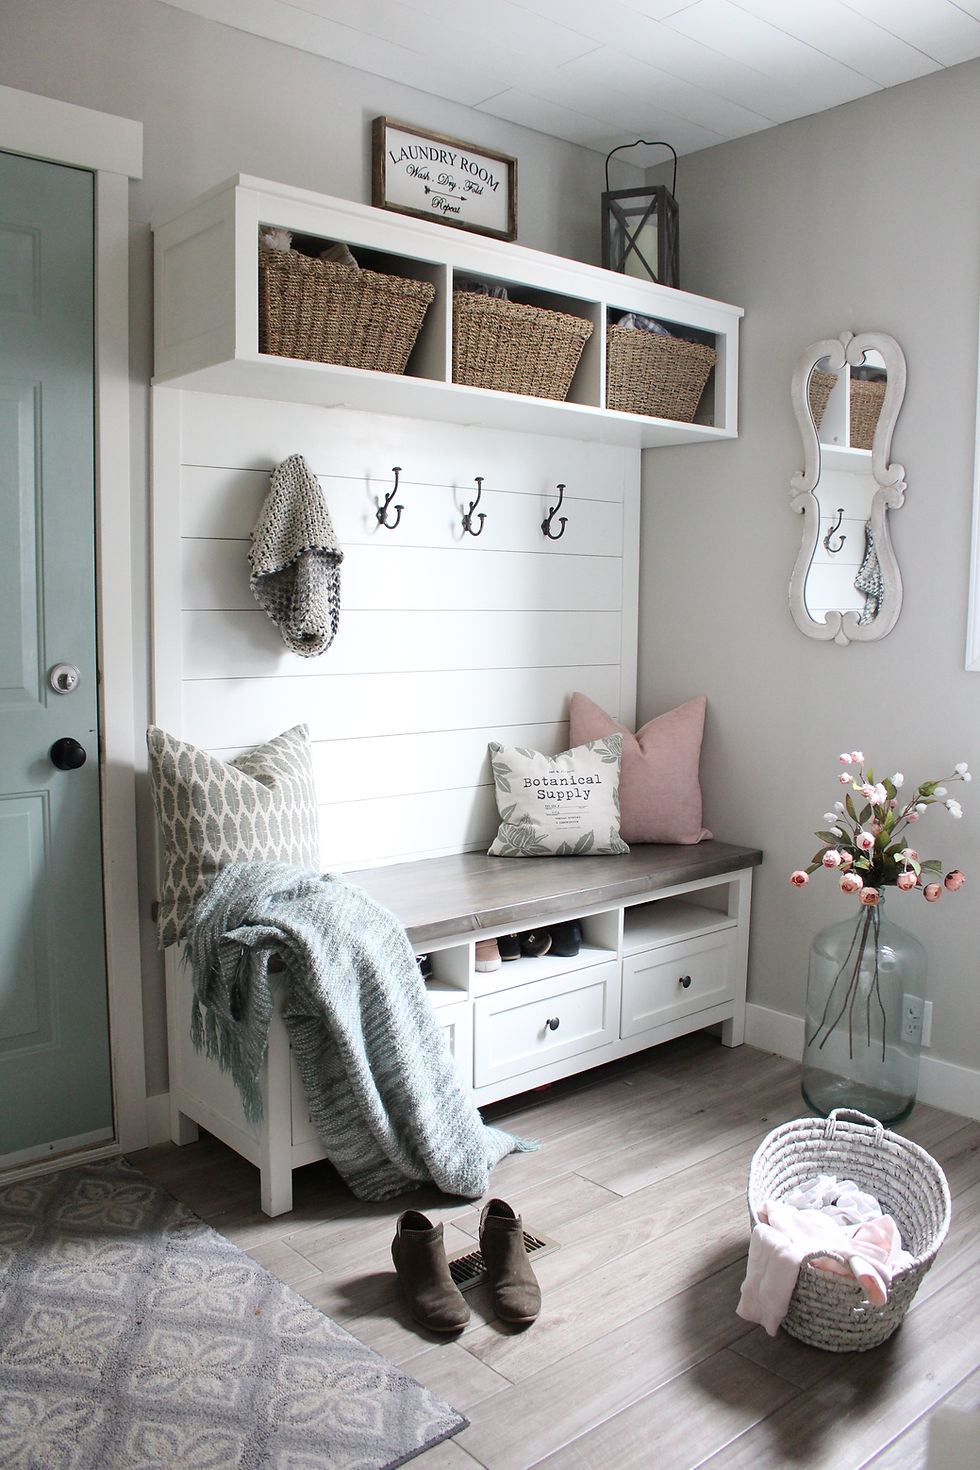
At this point the flooring is finished guys, yay (grout and floor tile links below)!! Also we did have some minor drywall repair work to do to the walls after the old closet was ripped out. I painted the walls in one of my favourite colours from Sherwin Williams Agreeable Grey as well as painting out all our new baseboards and trim in Benjamin Moore Simply White. Now we are installing our Ikea pieces to create a usable mudroom bench and storage unit. The best thing about this is we already had the Ikea pieces on hand in our basement (links below) so we didn’t even need to go out and spend any more money!
I looked at it one day and thought maybe this could somehow be used as a bench in our mudroom and the top bridging shelf as a place to hold baskets for extra storage for the kids’ gear. So off I ran upstairs and measured the wall where the closet was and was so excited to see it would fit with and with three inches to spare, whoopie go me!!!! I told Curtis and he loved the idea too which is always a bonus when the hubs is on board!
* Update
Since I wrote this article Ikea no longer sells the bridging shelf in the 58" length as well as in the white. The only one they currently sell is this one.
So we brought the bottom piece into the garage and started to beef it up by adding lattice wood strips on the drawer fronts and beefing up the top of the bench to make it look like a thick wood bench top. We used shiplap for the top of the bench (shiplap is 4mm presanded plywood that we get cut down to 6" strips from Home Depot) the reason we went with shiplap on the top is because we didn't want to add any more thickness to the top of the bench being that it was already high enough for us. Using our brad nailer we nailed down the shiplap boards down into the Ikea bench. After the shiplap was all attached we just finished out the edge and made a frame around the top of the bench using 1x2" pine boards and mitered the corners to get a nice finished frame look.


Ok so now onto the upper bridging shelf. Here we have installed it where our closet used to be. When Curtis mounted this, he mounted it directly into the studs, by going straight through the back of the shelf with his drill and into the wood studs. He also added some extra support with L brackets underneath the upper bridging shelf (cause he feels nothing could ever be secure enough lol)

Can you tell I was already so excited to see it go up that I couldn’t help myself but put some pretty baskets in it already, haha! Oh and these baskets I had on hand as well, they just happened to fit in these cubbies perfectly! I bought them at Canadian Tire many years ago and checked and unfortunately are no longer available...sorry guys.
We then brought the bottom bench in from the garage with all its new trim and top and then anchored it into the studs so it would be nice and secure when sitting on it. Then we created a frame of the entire unit onto the wall with some simple MDF 1/2" thick trim. You can see in the pic we just placed the trim between the bridging shelf and bench. After the frame was done, we installed the shiplap between the two Ikea pieces. I should also mention the distance between the two pieces from the top of the bench to the underneath of the bridging shelf is 42 1/2 inches. Now again, what we use for our shiplap is pre sanded plywood sheets which you can get at Home Depot. I believe they come in 4x8s sheets and cost about $32 a sheet. At the store you will get them to cut the sheets down to your desired width, we went with 6 strips. At our Home Depot they do not charge to cut, but I hear some stores do now unfortunately, just ask before hand. Then we mark our studs on the wall and applied the shiplap directly into the studs using our air compressor attached to our nail gun. Be sure to use a nickel between each strip for proper even spacing.

After all the shiplap was installed it was pretty much finished! One day I would like to add some pretty corbels to the underneath of the upper bridging shelf, but I’m still on the hunt for just the right ones. The only thing left to do was paint everything out, including the original Ikea white pieces so that all the white was to match the new paint. In order to paint already painted furniture I always like to give it a light sanding first and then apply a good coat of Bullseye 1-2-3 primer (link) first. After the priming was done I painted everything with the same trim colour that is in the rest of our house, Benjamin Moore Simply White. I left the interior of the upper boxes not painted so that the baskets wouldn’t scratch the paint.
The very last thing we did for the Ikea hack was add some pretty hooks to the shiplap. I found these hooks in my house and took them off an existing piece that I had found at HomeSense. I love the rustic look they add to the clean shiplap.

After our Ikea Hemnes hack was all done we decided to stack our washer and dryer to give our mudroom more floor space. Only issue was our current washer and dryer could not be stacked, nor could we buy stacking brackets for them because they were too old, so we decided we were going to have to invest in a new set so we could carry out with our original plan to make more room in here. After we got our shiny new washer and dryer all stacked and moved to the left side of the room, we had some empty wall space to the right of the machines for the first time ever! No more over whelming set of washer and dryer coming into this small space anymore. I felt like I could breath in here with all this room, haha, I say "room" but lets be real this is a teeny tiny space and any bit of extra square footage at my feet, even if its only 25 sq. ft. is a major bonus to me!! So what was I going to do for storage now that my useless cabinets are gone bye bye? Well my original plan was to get some fancy shmancy custom cabinet built ins, but I opted for the less expensive and more 'me' plan of attack...to look for something second hand and more affordable!

This second hand hutch is originally from Ikea and sadly they don't make it anymore. I bought it off of a friend who was selling it for $25 and thought it would be the cutest little addition to our laundry space and fit perfectly along that wall to the right of the washer and dryer. After I gave it a serious makeover (which I will be blogging about soon) I brought it into the laundry room and set it all up with all my laundry supplies and thought it was the most charming little addition to the space. It instantly brought character to an empty wall, and here it is now in all its beauty!!


*Additional notes- Door colour is Benjamin Moore Wythe Blue
So there you have it guys, our mudroom makeover! What do you guys think? I would love to hear from you! If you have any questions on what we did in here be sure to leave a comment below!
Thanks for stopping by friends!
Dale


https://onbetv2.com/ hôm trước mình thấy bạn bè share nên tò mò mở thử trên điện thoại xem sao. Mình không tạo tài khoản hay bấm chơi gì, chỉ lướt mấy trang giới thiệu cho biết. Cảm giác đầu tiên là trang nhìn gọn, chữ dễ đọc, kiểu chia từng khối nội dung nên kéo xuống không bị rối mắt. Có đoạn họ nhắc giấy phép PAGCOR từ 2016, mình thấy họ ghi khá rõ ràng, đọc lướt vẫn hiểu ý chứ không phải kiểu nhồi thông tin dài ngoằng. Mấy tiêu đề cũng làm nổi bật nên đang xem phần nào là nhận ra ngay, không phải đoán. Nói chung trải nghiệm lướt ổn, menu đặt dễ thấy và các…
hitclub dạo này thấy nhiều người nhắc nên mình cũng bấm vào xem thử cho biết. Mình không rành mấy vụ cá cược, chủ yếu tò mò cách họ làm trang thôi. Vừa vào là thấy giao diện khá dễ chịu, kiểu chia từng khối nội dung rõ ràng nên lướt xuống không bị rối mắt. Có đoạn nói họ ra mắt từ 2015 đọc qua cũng thấy yên tâm hơn, ít nhất không phải kiểu trang mới lập vội. Mấy tiêu đề đặt to, tách bạch nên mình đang ở mục nào là biết ngay, không cần mò. Nói chung cảm giác dùng thử vài phút là ổn, không bị lag hay phải bấm đi bấm lại nhiều. Nhìn…
Retro fashion fans often enjoy collecting pieces that bring back the bold energy of early 2000s style. Bright colors, baggy jeans, shiny fabrics, and graphic prints create a nostalgic look that still feels exciting today. Many collectors search for rare Y2K Apparel items because they capture the fun and creativity of that era. Vintage jackets, crop tops, and statement accessories help build unique outfits. These timeless fashion pieces keep retro culture alive for modern style lovers everywhere today and inspire fresh outfit ideas for dedicated fashion collectors and trend seekers.
https://keonhacai.cam/ mình mới lướt thử vì thấy vài người nhắc, chủ yếu tò mò giao diện chứ không đào sâu nội dung. Cảm giác đầu tiên là trang chia mục khá rõ ràng, nhìn vào là biết nên bấm chỗ nào, không bị “ngợp” như nhiều site khác. Mình thích kiểu họ trình bày thông tin theo dạng khối và danh sách, nên kéo xuống một chút là nắm được bố cục ngay. Mấy bảng dữ liệu cũng sắp xếp theo cột gọn gàng, nhìn nhanh vẫn dễ theo dõi chứ không rối mắt. Menu đặt chỗ dễ thấy nên chuyển qua lại giữa các mục cũng tiện, không phải mò lâu. Nói chung lướt vài phút là quen tay…
This was such a helpful and easy-to-follow DIY guide. Painting stair spindles can seem overwhelming, but your step-by-step explanation made it feel much more manageable. I also liked the realistic tips you shared from https://qualityfenceandcustomoutdoors.com/ experience. I recently read something similar on a based review blog and it added another useful angle to home improvement projects.