
DIY Rustic Mantel
- Feb 22, 2019
- 3 min read
Updated: Jan 18, 2022

Rustic mantels are all the rage these days. The texture, character and warmth they add to a fireplace is truly magical in my opinion, lol! Many mantels now are made with reclaimed beams found from old farms, a wood salvage yard or even a scrap wood pile in the middle of who knows where?? But, not everyone can get their hands on one of these unique pieces of wood...and not everyone can just go get in their truck and find that special diamond in the rough. We certainly know we couldn't find one...we tried for sure, but the few that we did come across were not quite deep enough or the right fit, or the seller was asking far too much for an old chunk of wood, so you know what we did....we decided to go through our own scrap wood pile in our garage and see if we could build something on our own...and boy did we ever! I love it so much more than anything else we could have found or purchased because we made it ourselves and now its become a special character piece to our home.
What you will need:
You decide on the width and length of your board depending on how deep and long your want your mantel, we bought a 1" x 8" knotty pine board from our local building supply store and used this to build our entire mantel
Brad Nails 18 guage 1 1/4"
Brad nail gun
L Brackets, we bought ours at Home Depot similar to these
Dry wall screws
Wood screws
Stain colour of your choice, I like Minwax brand
Stud finder
Wood Glue
*Before you get started be sure to check out my fireplace makeover videos on my Instagram for any further instructions.
Step 1:
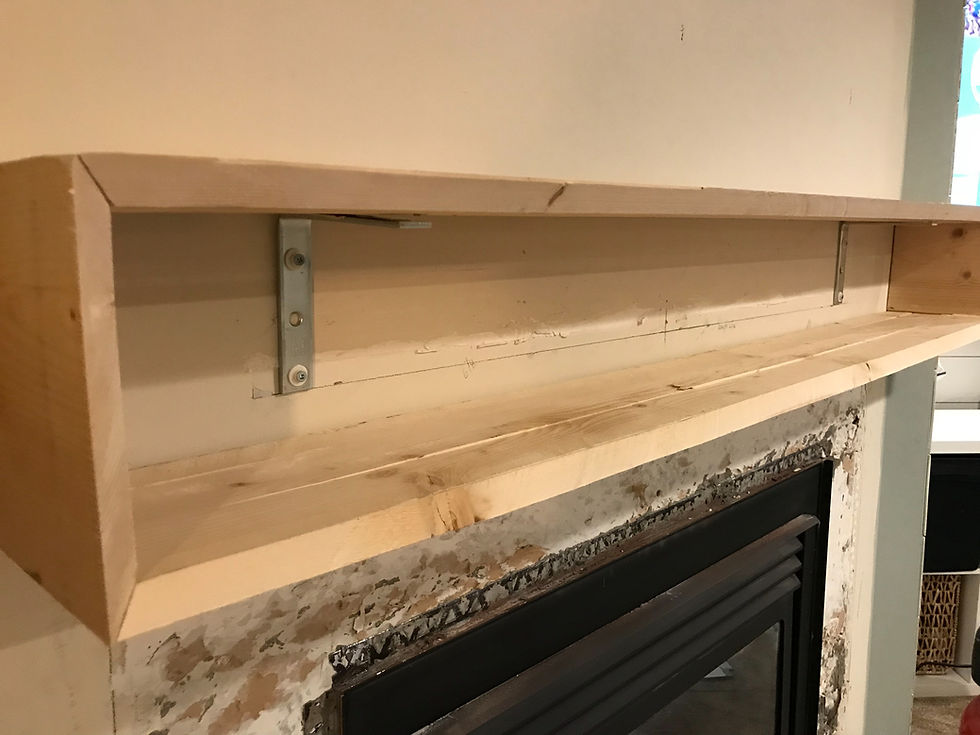
Find your studs with your stud finder first and mark it on your wall. This is where you will place your L brackets. We used 2 L brackets to support the length of our mantel, but you may need more support depending on the length of your wood. Our mantel is 56" in length, 8" deep and 7" high. Mount your L brackets to the wall with dry wall screws.
Step 2:
Now you will assemble your mantel first as a rectangular frame before you mount it to your brackets. We simply cut all our boards edges at 45 degree angles with our table saw so that the wood could look more like a big chunk rather than something that was all pieced together. We joined all our pieces together with wood glue first, and then we used our Brad nailer.

Step 3:
Now that the frame of your mantel is assembled, you will lay it on top of your L brackets. Attach your top piece of wood through the underside L bracket using your wood screws.

Step 4:
Now you will need to add your wood face piece to your rectangular frame. All of your edges of the face piece should also be at 45 degree angles as well, but be sure to cut the angles the opposite way so everything will fit together properly with your frame. One thing I did before I added the face piece was I gave it a good beating with a hammer, power sander and nails to really add extra texture and rough it up a bit more. This is the side that's going to show, so you might want to give it some more character. Attach your face piece using your wood glue on the edges and by using your Brad nailer all along the edges until you feel it is secure.
Step 5:
So your mantel should be fully built and mounted by now. Now its time to stain. I did my first coat in Minwax Early American and then decided after looking at it more that I wanted to enhance more of the character and texture of the wood, so I quickly did a wipe on wipe off of Minwax Jacobean, which is a much darker stain, but settled into all the grooves very nicely and enhanced the right parts of the wood.


I decided to not seal my mantel, but that is a personal choice. I wanted it to look like a reclaimed beam, so I didn't want to add any sheen to it what so ever.
So there you have it guys! A DIY rustic mantel made by our very own hands, and guess what you can do this too! It has added so much character and warmth to our fireplace, and I love how the wood plays off so nicely with the clean lines of the shiplap and subway tile.


So tell me below what you guys think of this DIY Mantel. Don't hesitate to ask any questions about this project! Have a great day guys!
Love,
Dale


EA88 bữa mình ghé thử vì thấy mọi người nhắc hoài, kiểu vào xem giao diện ra sao thôi. Ấn tượng đầu là cái H1 “Lorem ipsum dolor sit amet…” đặt ngay đầu trang nhìn khá rõ, nên vừa mở lên là biết trọng tâm nằm ở đâu. Kéo xuống chút thì thấy họ chia nội dung theo kiểu câu hỏi, có mục “Lorem Ipsum là gì?” nên đọc lướt cũng dễ bắt nhịp, không phải mò mẫm nhiều. Phần nội dung bên dưới đúng dạng văn bản mẫu dài, có đoạn nhắc tới Cicero với “De Finibus Bonorum et Malorum” nên trông giống trang tổng hợp thông tin tham khảo hơn là gì rối rắm. Mình thích cách họ…
https://tylekeobongda88.com/ hôm bữa mình lướt thấy ai đó nhắc nên bấm vào coi thử cho biết. Trang này nhìn khá dễ chịu, không bị rối mắt kiểu nhồi chữ, kéo xuống là thấy các khối nội dung tách bạch. Mình để ý nhất là phần kèo nhà cái với tỷ lệ kèo bóng đá hôm nay, số liệu để ngay ngắn nên nhìn phát là hiểu đang nói trận nào, không phải căng mắt tìm. Có thêm mục bài mới đăng nên nếu ghé nhanh cũng biết họ có cập nhật đều không. Nói chung thao tác qua lại cũng mượt, mấy bảng tỷ lệ trình bày theo cột gọn gàng và tiêu đề “kèo nhà cái – tỷ lệ…
TG88 Đăng Nhập hôm bữa mình cũng tò mò bấm vào xem thử chứ chưa chơi bời gì đâu. Vào cái là thấy giao diện khá “thoáng”, kiểu chữ với khoảng cách nhìn dễ chịu nên lướt không bị mỏi mắt. Mình chỉ kéo lên kéo xuống vài vòng để coi họ trình bày thế nào, thấy nội dung chia thành từng khối riêng nên nhìn phát biết chỗ nào là thông tin chính, chỗ nào là phụ. Có mấy bảng thông tin dạng cột nhìn gọn, không bị nhét chữ quá nhiều nên đọc nhanh hiểu luôn. Thanh menu đặt ngay chỗ dễ thấy nên đổi qua lại vài mục cũng tiện, không phải mò. Nói chung cảm giác…
F8BET COM hôm bữa mình lướt thấy người quen nhắc nên bấm vào coi thử cho biết chứ cũng không định làm gì nhiều. Vừa vào cái là thấy giao diện khá “dễ thở”, không bị nhồi chữ hay màu mè quá, nhìn một cái là biết nên bấm chỗ nào. Mình để ý mấy phần nội dung họ chia thành từng khối riêng, khoảng cách vừa phải nên kéo xuống không bị rối mắt. Cái mình thích nữa là thanh menu đặt khá lộ, chuyển qua lại nhanh, không phải mò mẫm tìm nút. Nói chung cảm giác giống mấy trang mình hay dùng nên làm quen rất lẹ, nhất là cách họ canh hàng và chia khung nội…
Mình có lần lướt đọc mấy trao đổi trên mạng شيخ روحاني thì thấy nhắc nên cũng tò mò mở ra xem thử cho biết. Mình không tìm hiểu sâu rauhane chỉ xem qua trong thời gian ngắn để quan sát bố cục s3udy cách sắp xếp các mục và trình bày nội dung tổng thể. Cảm giác là các phần được trình bày khá gọn, các mục rõ ràng nên đọc lướt cũng không bị rối Berlinintim, với mình như vậy là đủ để nắm tin cơ bản rồi. q8yat
–