
DIY Pottery Style Lamps
- Mar 20, 2021
- 5 min read
Updated: Jan 17, 2022
Want to know how I took some boring old thrifted lamps and turned them into unique pottery looking show stoppers!? Today I want to share with you guys the simple steps I took to achieve this easy makeover that anyone can do! So get your gloves on, grab some paint, and most importantly get some drop cloth down and prepare for things to get a bit messy today.

Here's what you need for this makeover:
Old lamps, preferably something without too much detail and like the shape of. Chunky is very trendy right now
Dry Wall Compound
Fine sandpaper or a sanding sponge, 220-320 grit
Gloves
Painters Tape
Drop Cloth or Paper
Sponges or paint brushes
Acrylic Paints in a few colours of your choosing
*Optional- popsicle sticks or wooden tongue depressors

Alright, so let me first start off by showing you guys some inspo pics I found online of the looks I liked and what I was trying to achieve. The 'found' pottery look is so on trend now and I think it's definitely an achievable look anyone can get with old objects they have in their house rather than spending a small fortune at high end stores to get the same look.


The lamps I am using for this project I found on Facebook Marketplace for $10 for both! Talk about a score! Try to find something you like the shape of, go to thrift stores and look on buy and sell sites. Don't worry about the ugliness of it, you are just focusing on the shape of them. I really lucked out when I found mine. They were the prettiest shape, very simple and didn't even come with shades, which was fine by me as the price was right and I already had some shades I could use from another lamp set I would be selling that were a bit outdated.
1. So first thing you will need to do that I didn't do and should have, is tape off and protect the top of the lamp where the bulb screws into and around the brass post, you don't want to get any compound in this area and wreck anything. Also lay out some paper or old drop cloth underneath the lamps.

2. Start by roughing up the surface of your lamps, use your sandpaper to do this. Give them a sanding enough to just rough up the surface of the lamps a bit. This will help with better adhesion of the compound. My lamps were very shiny so I knew I would have to give them a bit of "tooth" surface. That means a surface that will help bind what you are going to put on top of it. Once you are done sanding give them a wipe down.
3. Now it's time for things to get a bit messy. I had some drywall compound already and I think I got mine at Home Depot, but here is also another kind that could work if you need a good recommendation. Get some gloves on and simply grab some of the compound and start smearing it onto the lamp bases. While applying the compound try not to glob it on too thick. You are going to probably need 2 good layers of this so that it dries properly. While I applied my first layer it sort of smeared around a bit rather than sticking. This is because my lamps were very glossy to begin with, even though I sanded them they still had a very slippery surface to work on. So I knew I would need my first coat to be a bit thinner so that the next coat could go on more easily and generously.
This is a similar method I did recently to some thrifted chunky vases I made over. You can see that blog post here.

Here's a video I shot that you might find helpful of me applying the compoound.
4: Once that first layer has dried according to it's dry time as stated on the package, you are now ready to put another coat on. This time I went a bit more thick and also used my wooden stick to help smooth out the product. From looking at the inspo pics I knew I needed to get a smooth look, so I used the stick to help with spreading it on. When both lamps were fully dried I brought them into the garage and started to sand them to get them even smoother. This stuff is dusty so make sure you sand in a place you can get dirty, outside would be perfect, but here it was too cold out for that!

And here's what they looked like after I sanded both lamps smooth....

I then brought them back inside and started to wipe them down with a wet rag.....and I noticed something happening once I started wiping, a really neat texture started to appear! Almost like little holes. Makes sense though...the water would penetrate the compound and that's exactly what happened and I actually loved the look so much! It really added to the finish.
You can kinda see those little holes here....

5. Once I was happy with the final look, it was then time to paint! Here's where you can get creative. I find it so helpful to have a picture pulled up of a piece I like and am drawn to. In my case I went with this look from Restoration Hardware. I always like to source out the high end shops to get the best inspo and RH never fails.

I knew I would need some black, greys, a tan and a caramel colour to get this type of finish, so here's what I used. I purchased mine at Michaels, but I will link for Amazon as it's a bit easier than the Michaels site. Also if you want to get the colour I did, you don't have to buy these exact paints, just try to find something similar.
Black Acrylic Paint


I started with stippling on some of the black, then I mixed some black with the Parisan Grey and then stippled that on too. I made sure I had the inspo pic on the big screen so I could really try to recreate the look to the best of my ability. After I was done covering the majority of the lamps with the black and greys, I then started to highlight with the honey comb and castle colours. Just eye ball as you go, always take a step back and see if you like where the look is going.


So here's what it looked like after I was all done painting. Sorry I took the pic in the evening and didn't wait to take a better one during the day, but I did decide I wanted it a bit lighter and went over the entire lamps again with a bit more of the lighter shades.
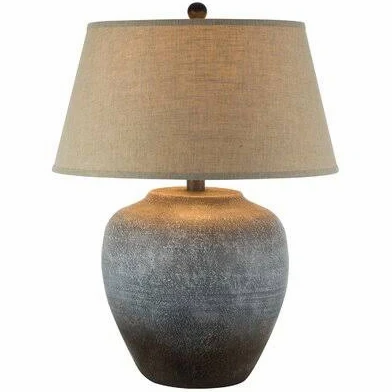
Here's what they look like now in the day light!!

Do you love it!? I love the added highlighting I gave it, it helped to brighten them up a bit and give more of a distressed look. The compound gives it the most amazing clay texture and now they have the appearance of old unique pottery. It's amazing what some compound and random paints I had kicken around did to these old boring lamps. Texture and colour does wonders for anything!


Lucy wanted to model them a bit for you guys too....


The lamp shades could be a bit bigger, but that's all I had right now. I can see where my paint got a bit on the brass posts too, so that's why you should use painters tape! Learn from my mistakes guys, lol!
Hope you guys liked this tutorial and if you have any questions drop me a comment below!
Have a great day!
Dale


This DIY idea is genuinely beautiful. The handmade pottery-style texture gives the lamps such a warm and calming aesthetic, especially for cozy modern interiors. Projects like these also pair really well with minimalist furniture setups — even a simple wall mounted table nearby can help create a clean and creative corner with a stylish handcrafted vibe.
This DIY idea is genuinely beautiful. The handmade pottery-style texture gives the lamps such a warm and calming aesthetic, especially for cozy modern interiors. Projects like these also pair really well with minimalist furniture setups — even a simple wall mounted table nearby can help create a clean and creative corner with a stylish handcrafted vibe.
The NHA beneficiary portal login system supports secure and smooth digital healthcare services. It enhances overall user convenience.
Beyond just showing scores, sarkari result acts as a comprehensive career planning guide for thousands of students every month. By listing upcoming recruitment notices months in advance, it allows for better preparation strategies and academic planning. This foresight is invaluable in a high-stakes environment where every day of dedicated study counts toward a candidate's selection.
TRACELOANS.com provides a level of detail that helps borrowers avoid costly mistakes. Their loan breakdowns are both thorough and practical. Click here for TraceLoans