
DIY Rustic Mantel
- Dale Wedge

- Feb 22, 2019
- 3 min read
Updated: Jan 18, 2022

Rustic mantels are all the rage these days. The texture, character and warmth they add to a fireplace is truly magical in my opinion, lol! Many mantels now are made with reclaimed beams found from old farms, a wood salvage yard or even a scrap wood pile in the middle of who knows where?? But, not everyone can get their hands on one of these unique pieces of wood...and not everyone can just go get in their truck and find that special diamond in the rough. We certainly know we couldn't find one...we tried for sure, but the few that we did come across were not quite deep enough or the right fit, or the seller was asking far too much for an old chunk of wood, so you know what we did....we decided to go through our own scrap wood pile in our garage and see if we could build something on our own...and boy did we ever! I love it so much more than anything else we could have found or purchased because we made it ourselves and now its become a special character piece to our home.
What you will need:
You decide on the width and length of your board depending on how deep and long your want your mantel, we bought a 1" x 8" knotty pine board from our local building supply store and used this to build our entire mantel
Brad Nails 18 guage 1 1/4"
Brad nail gun
L Brackets, we bought ours at Home Depot similar to these
Dry wall screws
Wood screws
Stain colour of your choice, I like Minwax brand
Stud finder
Wood Glue
*Before you get started be sure to check out my fireplace makeover videos on my Instagram for any further instructions.
Step 1:
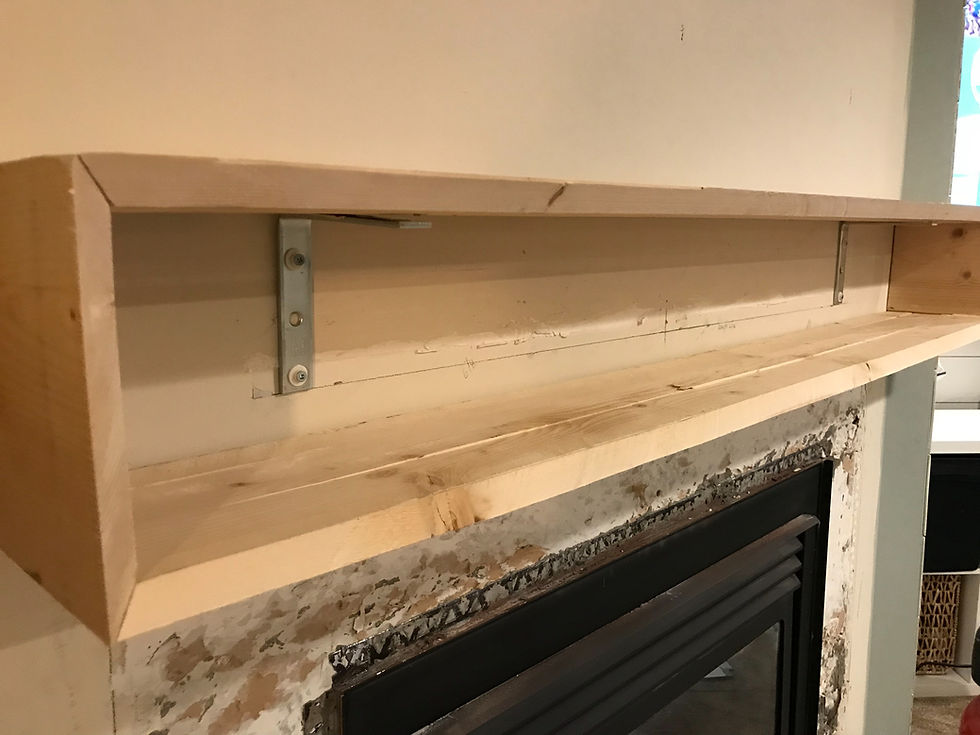
Find your studs with your stud finder first and mark it on your wall. This is where you will place your L brackets. We used 2 L brackets to support the length of our mantel, but you may need more support depending on the length of your wood. Our mantel is 56" in length, 8" deep and 7" high. Mount your L brackets to the wall with dry wall screws.
Step 2:
Now you will assemble your mantel first as a rectangular frame before you mount it to your brackets. We simply cut all our boards edges at 45 degree angles with our table saw so that the wood could look more like a big chunk rather than something that was all pieced together. We joined all our pieces together with wood glue first, and then we used our Brad nailer.

Step 3:
Now that the frame of your mantel is assembled, you will lay it on top of your L brackets. Attach your top piece of wood through the underside L bracket using your wood screws.

Step 4:
Now you will need to add your wood face piece to your rectangular frame. All of your edges of the face piece should also be at 45 degree angles as well, but be sure to cut the angles the opposite way so everything will fit together properly with your frame. One thing I did before I added the face piece was I gave it a good beating with a hammer, power sander and nails to really add extra texture and rough it up a bit more. This is the side that's going to show, so you might want to give it some more character. Attach your face piece using your wood glue on the edges and by using your Brad nailer all along the edges until you feel it is secure.
Step 5:
So your mantel should be fully built and mounted by now. Now its time to stain. I did my first coat in Minwax Early American and then decided after looking at it more that I wanted to enhance more of the character and texture of the wood, so I quickly did a wipe on wipe off of Minwax Jacobean, which is a much darker stain, but settled into all the grooves very nicely and enhanced the right parts of the wood.


I decided to not seal my mantel, but that is a personal choice. I wanted it to look like a reclaimed beam, so I didn't want to add any sheen to it what so ever.
So there you have it guys! A DIY rustic mantel made by our very own hands, and guess what you can do this too! It has added so much character and warmth to our fireplace, and I love how the wood plays off so nicely with the clean lines of the shiplap and subway tile.


So tell me below what you guys think of this DIY Mantel. Don't hesitate to ask any questions about this project! Have a great day guys!
Love,
Dale


CapCut APK Pro helps bring DIY projects to life with professional editing features. Create stunning videos of your rustic mantel build, capturing each step from wood cutting to final touches. Add smooth transitions, text overlays, and background music to enhance your tutorial, making it engaging and easy for viewers to follow. See More
CapCut APK Pro is perfect for editing DIY project videos with professional tools and effects. Showcase your step-by-step process of building a rustic mantel using reclaimed wood. Add transitions, text, and music to highlight each stage creatively. Share your finished masterpiece with polished visuals that reflect your craftsmanship and style.
Deepseek Login enhances home projects like DIY Rustic Mantel by offering design tips, material suggestions, and personalized plans. With intelligent guidance, users can confidently create warm, timeless decor that blends natural charm with modern craftsmanship for any living space.
A DIY Rustic Mantel adds warmth and authenticity to your space—just like protecting yourself from Paytm spoof scams adds security to your digital life. Both require careful planning, trusted tools, and attention to detail to build something real, safe, and truly lasting. Visit here
A DIY Rustic Mantel brings character and charm—like a Castle scene set just right. On the Castle app for iOS, piece together clues and style, crafting a cozy centerpiece. Each beam and nail adds depth, just like every twist in Castle’s investigations.